Editing and retouching are advanced and the final step of photography that enhances the aesthetics and fixes the contrast that couldn’t be captured by the camera.
For beginners navigating through a set of features and understanding the technicalities could be tough, especially understanding the shortcut keys, which make the entire task more efficient.
One such renowned application that is used by dozens of content creators, commercial platforms, and businesses is Adobe Photoshop. A premium photo editing software that is embedded with dozens of features and editing functionality to help you get the professional touch.
As a novice editor, the first few steps are the most bewildering part of the software, but as you go through the basics, the editing task becomes easier.
How to do Basic Editing With Adobe Photoshop?
The basic editing tasks include cropping, adjusting contrast, removing or adding objects, and adding filters. This guide is going to be helpful for you to grasp the fundamentals of editing.
So without further ado, let’s begin.
Getting Started With Photoshop
At first glance, Adobe Photoshop might look complicated, especially with the abundance of tools and options embedded on the dashboard. However, this makes navigating easier, and you won’t have to hover around different modules to find what you truly need.
Initially it requires practice and consistency to be familiar with the software. On the left-hand side you have a toolbox that has sets of crucial elements that you will be needing in editing. Some of the common terminology you should be aware of is panels, which refers to the different docs in Photoshop.
Another is layer, which refers to the images stacked on one-another. It makes it easier to edit without affecting the rest of the image. Now let’s move towards the editing part.
Cropping

The UI of Adobe Photoshop makes it easier for beginners to locate and use the Crop Tool. Cropping allows you to remove unwanted edges, straighten images, or focus on a specific part of your photo.
Steps to crop images on Adobe:
- Locate the crop icon
at the toolbar on the left side or simply press ‘C’.
- A rectangular cut-down cursor will appear; drag and move around the area that you want to keep.
- Press Enter or click the checkmark on the top menu bar to apply the crop.
Adjusting Contrast and Lighting
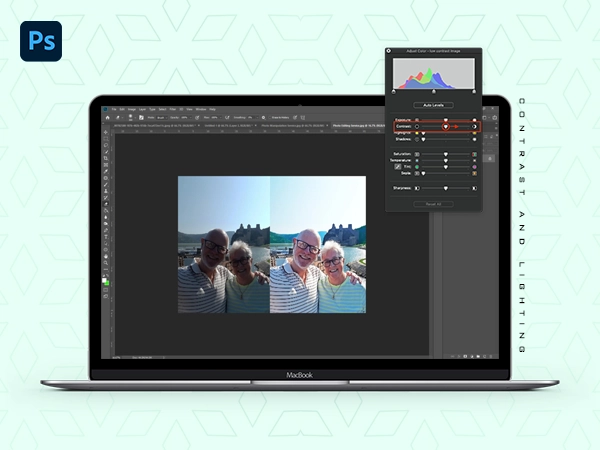
Now supposedly you are happy with the cropped image but not exactly pleased with what the camera captured; you have the option to adjust contrast and brightness. This is a basic step in editing and closely relates to what professionals offer through Photo Color Correction Services to enhance overall image tone and appeal.
- Go to Image > Adjustments > Brightness/Contrast from the top menu bar. If you have multiple layers, then select the layer from the right panel.
- Or go to Adjustments and the right panel and click on the brightness logo
.
- Adjust the slider accordingly; whatever feels aesthetic to you.
Removing or Adding Object

Adding or removing might seem to be the difficult task in Photoshop, but that’s not true. It’s among the easiest things to execute, and even a small kid can do such a pivotal task.
Follow the steps to remove items:
- Use the Lasso Tool (L) or Object Selection Tool (W) to draw around the object you want to remove.
- Go to Edit > Content-Aware Fill. Adobe Photoshop will analyze the background and automatically fill out the section.
- For uneven areas, click ‘J’ Spot Healing Brush Tool will appear, and simply brush over the area.
To add an image or object:
- First open the image from where you want to get the object. By quick selection, select the area.
- Press Ctrl + C to copy and Ctrl + V to paste it onto your main image. The object will appear as a new layer.
- Use adjust brightness/contrast or filters to blend the object naturally with the background, especially after a photo background removal for a seamless finish.
Filters

Filters enhance the appeal of images and allow different layers to blend with each other. Compared to other photo editing software, we have a plethora of options in Adobe Photoshop.
Here’s how you can add filters of your choice:
- Right-click on the layer and enable “Convert to Smart Object.” This would allow you to remove filters without affecting the originality of the image.
- Go to the top menu bar and click on Filter. A dropdown menu will appear with various filter categories.
- Choose among the various options like oil, blur, distort, sharpen, and so on.
Adding and Editing Text

Working with the texts in Photoshop is different compared to editing images. If you want to add text to an image or create a new layer, this is how you can do it.
- On the left-hand toolbar, click the Text Tool icon
or simply press ‘T’ on your keyboard.
- Click anywhere on the canvas; for a vertical text block, click on the Type tool again.
- Start typing the desired text. You’ll notice it appears in a bounding box, which you can resize or move around.
These were the basic editing tutorials you can begin within Photoshop. However, for commercial usage, it is important to display professionalism, whether it’s for advertising, social media, product catalogs, or portfolios.
It is essential to get expert guidance and enhance the aesthetics that ensure your visuals are not only eye-catching but also aligned with your brand identity.
To make the task of retouching easier and cheaper Visuals Clipping is your one-stop destination. With a team of experts and experienced graphic designers, we are here to offer quality photo editing services tailored for e-commerce, fashion, real estate, and more.
Conclusion
As a beginner, Adobe Photoshop is the best software in the market, but for advanced and detailed work, you would surely need professional assistance. Visuals Clipping is a renowned platform in the US and globally with over a 99.9% customer satisfaction rate and timely delivery.
Whether you want to make retouching in bulk or go for a customized plan, we offer flexible plans that meet the needs of our clients. Do visit our website and know more about us through our portfolio and testimonials.
FAQs
How do I edit something out of a picture in Photoshop?
There are various methods to remove an object; you can either do it by AI generative using the brush to remove the object. Or you can use the traditional method of content-aware fill.
How do I Photoshop a picture into another picture?
Open both the images in Photoshop and select the object that you want to import. Go to the image that you want to use as a background and drag the selected image.
Why is opting for a professional photo retouching service essential for businesses?
For businesses and e-commerce sites, visual representation is everything. Product images should look crisp and refined, making it easy for shoppers to make an informed decision, and those images can be extensively used for marketing.
What kind of services are available at Visuals Clipping?
Jewelry image retouching, automobile image retouching, apparel photo editing, and background removal are the services that you can avail at Visuals Clipping.