An important part of photography is the shooting environment, as the environment gives a natural effect wherever you are standing for the photography. Wedding photo editing also depends heavily on whether the photographs were captured indoors or outdoors. If the photography was done outside in the presence of sun, it will have a natural light effect; extreme contrast creates deep shadows and causes lens flare. No one wants raccoon eyes in photos: a dark face and a light background; that’s why choosing the right environment for an aesthetic look is important. Also, exposure to harsh sunlight for a long duration causes skin burn. Couples in pre-wedding or wedding shots often choose the outside environment or venue that is complementary to their look and makes their personality magnetic. Indoor photography is preferred when a person does not have enough time to search for and manage the spot, or due to various other conditions like weather, the most common problem, or any pandemic. Even in indoor photography, people with tricks can create an exquisite look.
Here are the tips that many professionals prefer to make successful photographs.
Also Read: Best Wedding Photography Backdrops: Styles, Ideas & Expert Tips
Why the Wedding Editing Approach Depends on the Shooting Environment
Natural charm always comes from outdoor photography in places that directly embrace the worth of what you are wearing; natural light gives the benefit of a vibrant, cinematic, and lively look. The time of day is important in photography. Replicating the look of a soft glow on a flattered skin tone artificially is very difficult and very much possible in natural light. The sense of freedom is created by an outdoor setting in an open sky surrounded by greenery with a flower-and-fruit-scented air.
During the COVID times, many couples preferred indoor wedding shoots.
During the wedding shoot, capturing the right moment tells half the story behind it. Indoor photography provides a complete, controlled, creative look within the comfort zone.
Outdoor Wedding Photo Editing Techniques
Before starting photography, one should know about the golden hours; golden hours fall between the last 2 hrs before sunset and the first hours after sunrise. It is the time period when light is warm and low, producing diffuse light and creating long shadows. Weather doesn’t change after informing you via emails or chats; one should be prepared for this type of cause, and professionals have many tricks to overcome this and shorten this with a very approachable way to enhance the surroundings.
- Step 1: Organize and Cull Your Photos
- Step 2: Correct Lighting and Exposure
- Step 3: Enhance Skin Tones
- Step 4: Fine-Tune Colors and Style
- Step 5: Remove Distractions
- Step 6: Batch Process for Speed
- Step 7: Delivering and Presenting
Taming Harsh Sunlight and Deep Shadows
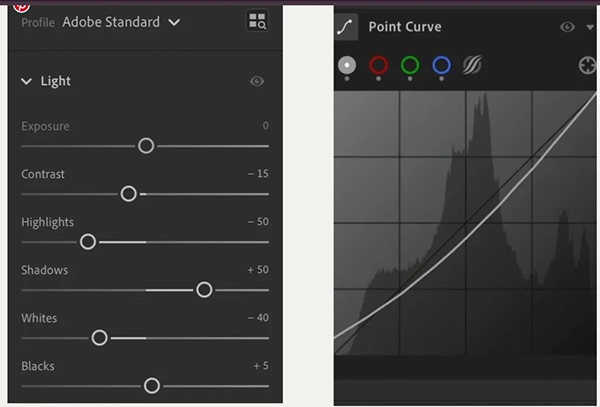
- Noon is considered harsh sunlight exposure because the sun hangs above the head. In this condition, we have to soften the light by lowering the contrast, whites by decreasing the highlights and increasing the shadows, and blacks, as shown in the picture.
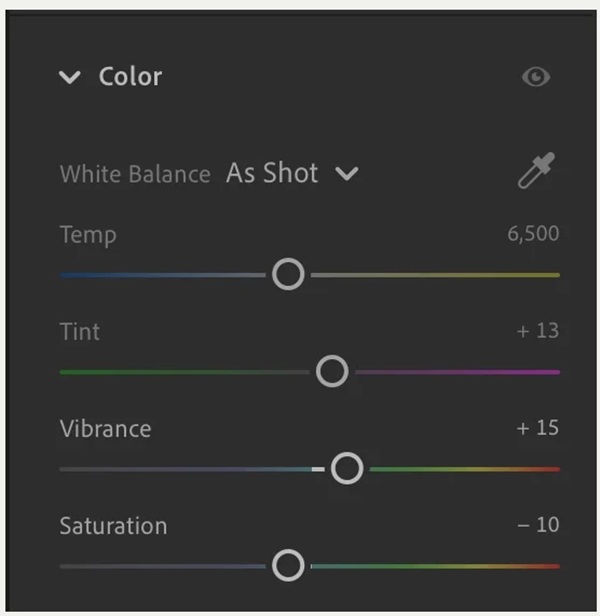
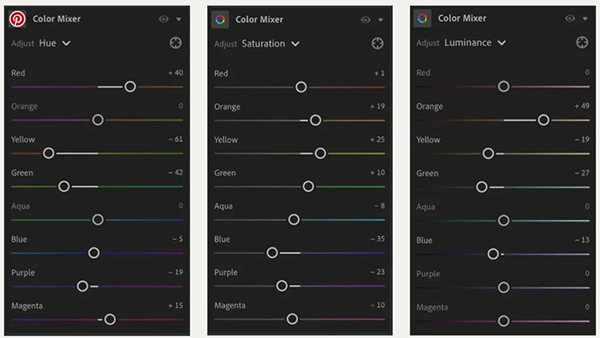
- This step is followed by shifting the color that suits best to your view for capturing a photo that looks like it was taken in golden hour, shifting the hue, saturation, and luminance. Saturation reduces intense color in the lighting, followed by luminance to increase the saturation effect; color plays a major role in shifting the effect from red to orange, yellow to orange, or blue to aqua.
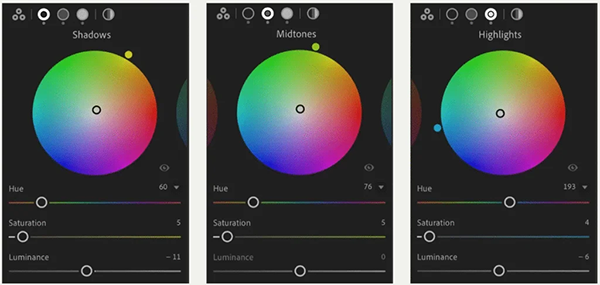
- Adding color grading to include warmth in shadows and adding a little green in effect, blue for highlights. All these changes nullify the effect of harsh sunlight.
- Decreasing sharpening and clarity and adding vignetting, gradients, and decreasing the exposure; this will darken the bottom of the view and draw attention to the centre.
Enhancing Skies and Outdoor Backgrounds
When starting the photography, the professional considered how and what to do with the ambient source of light and how to balance it. When encountering the sky light, looking for a properly exposed surface means the viewer is able to see the details in highlights and lowlight details while maintaining the details of handling the camera at an angle.
Preserving Natural Skin Tones in Direct Sun
While editing the photos, photographers are aware that no person looks sick, so they maintain the natural skin tone color that corresponds to the environment. This is achieved by balancing colors and making editable changes in photos. The hue of skin color can be edited with the help of the color temperature of lighting used during the shoot. For example, lighting used for the photograph has a warm or yellowish hue, the skin tones in the photograph should also have a warm or yellowish hue to match the overall color temperature of the photograph. Similarly, if the lighting has a cooler or bluish hue, the skin tones should have a cooler or bluish hue to match the overall color temperature.
Navigating the Shift From Midday Glare to Golden Hour
In midday shoots, when the sun is directly above the head, it is important to use an off-camera flash, being in the position where your back faces the sun, as this helps to maintain the natural expression of the individual’s face with their colleague, couple, or friend. While clicking photos at midday, outside, it is important to look for reflective surfaces or anything that can reflect or bounce back the light; this includes white walls, white surfaces, white shirts, etc.
Indoor Wedding Photo Editing Techniques
Indoor wedding photography requires mindful creativity skills, and adaptability. Because indoor wedding shoots require logical thinking that involves how to manage low-light conditions, work with limited natural light, and limited space, wedding photographers come prepared to tackle these obstacles to capture beautiful, adorable, memorable moments.
One common primary challenge of indoor wedding photography is handling low-light conditions. This can result in poorly generated images if not handled properly.
Here are the steps for indoor wedding photoshoots
Utilize Fast Lenses:
- Wide apertures (e.g., f/1.4 or f/1.8): Allow more light to enter the camera.
- Faster shutter speeds: Reduce motion blur.
- Lower ISO settings: Help reduce noise.
- Sharper images: Even in dimly lit environments.
Leverage External Lighting:
- Invest in speedlights or continuous LED lights: Significantly improve photo quality.
- Bounce light off walls or ceilings: Create softer, more natural illumination.
- Mimic daylight: Achieve a natural look.
Use Reflectors:
- Redirect available light: Onto your subjects.
- Reduce shadows: Enhance overall brightness.
- Various sizes and colors: Control light intensity and quality.
Correcting Mixed and Artificial Venue Lighting
Noise Reduction for Low-Light Venues
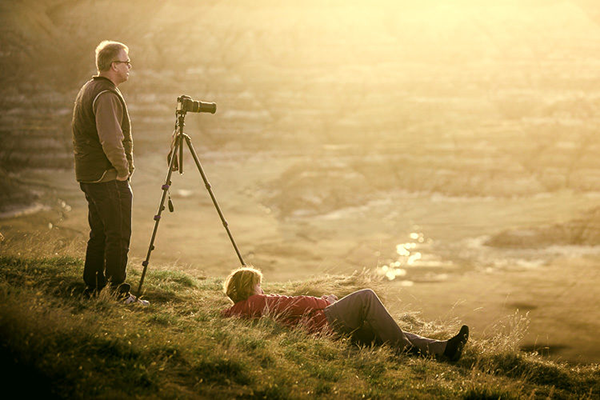
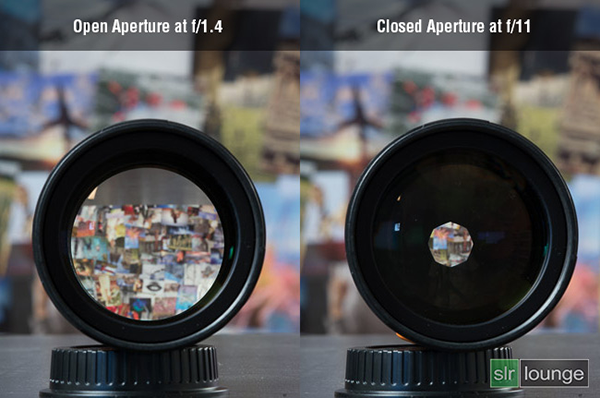
Noise in terms of photography refers to distortion of the picture with respect to texture, color, or random dots. Grain and static are commonly associated terms in the field of photography related to noise; in terms of photography, there are two types of noise, i.e colored noise and luminous noise. Grain simply means the picture is taken in low-light conditions where the picture has a rough texture; a sandy look often comes under luminous noise, while static is the multicolored, messy glitch that comes under color noise.
Here is a good way to reduce noise in low light:
- Using a tripod and a slow shutter speed, as this will allow you to entrap large amount of light
- Wide Aperture with the lowest f-number.
Correcting White Balance for Indoor Venue Lighting
The interior of the venue has different lights, which directly impact the photographs and may change the color of the photograph.
The wedding venue has yellow, white, blue, or warm light, which is a factor upon which skin and dress colors seem different while viewing; white balance is used to correct these and create natural color contrast.
Enhancing Wedding Decor and Lighting Details
To make the wedding venue memorable, decoration and lighting details play a major role in visibility to viewers. The wedding venue may have flowers, candles, lights, and stage decoration. By editing the contrast, brightness, highlights, and adjusting the shadows, we can enhance the details, but overediting can make decoration unrealistic.
Adapting Skin Retouching for Indoor vs. Outdoor Portraits
Indoor and outdoor photos have different editing or photo retouching approaches for skin; retouching does not mean making skin smooth like plastic; it means natural skin texture must be maintained.
In an indoor setting, the major problem is that artificial light makes skin look dull, pale, yellow, or orange in look; sometimes shadows may come and surprise, so skin tone must be maintained naturally.
In outdoor settings, strong sunlight leads to harsh shadows; sunlight highlights the skin most by brightening. This is the reason why adjusting skin color tone and shadow is to be done carefully.
Also Read: What is Photo Retouching? Importance, Types & Professional Uses
Color Grading Approaches: Outdoor Warmth vs. Indoor Ambience
Color grading refers to adjusting the overall color and mood of a photo. In Outdoor wedding photos, a warm or golden tone is used to give a happy-feeling look and enhance the Overjoyed feeling. Whereas in indoor photos, existing lights and the surroundings’ atmosphere are the main key players because adjusting to those will give a clear look; if there is a presence of golden lights so editor must not remove this ambience completely.
A Combined Editing Workflow for Weddings With Both Settings
As a wedding is a long day, some indoor and outdoor photography is taken to record those beautiful moments, and this requires a combined workflow; for example, if morning and afternoon photography is taken outside and evening photos taken inside, along with reception photos inside, editing all photographs in a completely different way will make the album look odd. Many professionals follow steps like organizing the photos first, correcting the exposure, and adjusting white balance, keeping the skin consistent throughout the photography, then adjusting the indoor and outdoor lighting accordingly, then checking the final photos together. This makes all weddings look consistent.
Also Read: 8 Photo Editing Techniques Every Photographer Should Know
Common Outdoor and Indoor Wedding Photo Editing Mistakes
- Too much brightening
- Too much saturation
- Making skin look unnatural
- Excessive sharpening
- Making shadows darker and highlights white
- Mismatching the color of indoor and outdoor photos.
How Visuals Clipping Approaches Outdoor and Indoor Wedding Editing
Wedding photography is like a marathon. Editing all those shots to a standard after shooting thousands of raw frames for a variety of shooting styles – midday sun, golden hour, low light – can be a burden on your schedule. Outsourcing to Visuals Clipping gives you your time back so you can focus on your clients and booking new work.
Our editors have more than 20 years of experience, ensuring that your whole gallery is one complete story. We effortlessly reduce exposure recovery, mixed-lighting white balance, and high-ISO noise, while maintaining flawless skin tones from outdoor portraits to the indoor dance floor. Whether you’re looking for exquisite décor enhancements or impeccable portrait retouching, we handle all the technical work.
We deliver complete wedding galleries within 12-24 hours at flexible image-based pricing. Test our workflow risk-free today and edit 10 images FREE– no credit card or advance payment needed.
Frequently Asked Questions (FAQs)
Q1. Do outdoor and indoor wedding photos need different retouching?
Ans: Yes. Outdoor editing is for subduing strong sunlight and extracting information from the skies, while indoor editing is to neutralize artificial color casts and to minimize high-ISO digital noise.
Q2. What color temperature should I use for outdoor golden hour wedding photos?
Ans:A color temperature between 5,500K and 6,500K is ideal. This leaves skin tones naturally golden without being artificially orange.
Q3. How long does it take to edit a full wedding gallery?
Ans: While in-house editing can take a photographer several weeks to complete, outsourcing to Visuals Clipping ensures a complete gallery is delivered within 12-24 hours.
Q4. How is skin tone corrected differently indoors vs outdoors?
Ans: Indoor correction is to remove the muddy yellow or green color cast caused by the artificial light source of the venue, and outdoor correction is to remove the dark shadows under the eyes caused by the overhead sunlight.
Q5. Can editing fix poor indoor wedding lighting?
Ans: Yes, editing RAW files can help recover shadow details, correct mixed lighting, and eliminate grain, but it cannot correct severe motion blur from slow shutter speeds.