When making a cinematic portrait, everything has to be perfect. The lighting, the setting, and the face: there should be a balance in expression on the face. An AI image generator has various amounts and types of settings that can be used to produce the desired image.
A slight change in a setting can have a pretty big effect on the image. See this image below of a woman in a theater; the background is blurred and has soft lighting to put focus on the woman, and the shadow helps in the environment.
To learn how to make something like this, read this blog.

Where the Light Comes From Matters More Than the Color Grade
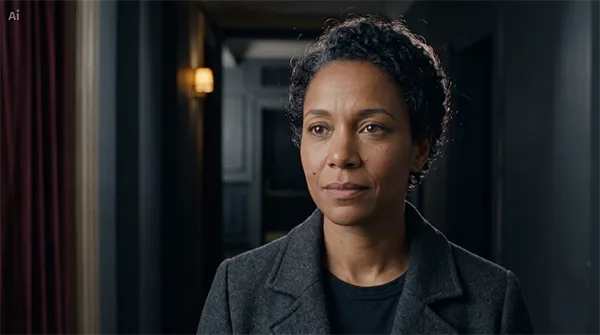
In the corridor portrait, a small amber lamp sits behind the subject. It gives the background a warm point of interest, while broader, softer illumination makes her face readable. The light on her skin does not need to match the lamp exactly because they serve different parts of the scene.
Describe the main face light first: where it comes from, how broad it is, and which cheek receives it. This gives clearer direction than “cinematic orange and teal lighting.”Then describe any background light separately: “Soft neutral light from camera-left, with a dim amber lamp farther down the corridor.” That distinction is useful when writing a prompt.
Adding more colors or props would not necessarily make that moment more convincing. Here, dark walls surround the face, a curtain establishes the setting, and the subject looks just beyond the lens. The image leaves a small question unanswered: what has made her pause? A film-like mood can come from restraint.
Natural Skin Needs Uneven Detail
Fine lines near the eyes, a slight sheen on the nose, and softer detail across a shadowed cheek create variation. Asking for extreme sharpness across the entire face can work against the quiet photographic look you want. Skin does not have the same texture everywhere. For a polished finish that preserves realistic skin texture, consider professional photo retouching to refine fine details without losing the image’s natural character.
For this mature subject, use descriptions that suit the person and the framing; subtle smile lines and a few gray strands help establish age without exaggeration. In a chest-up portrait, pores should remain a secondary detail. The viewer should notice the expression before the texture.
Keep the complexion distinct from the scene’s palette. A cool environment can surround medium-brown skin without turning the whole face blue. If you want stronger color, try placing it on the background or along the hairline first. This leaves more room for natural variation across the cheeks and forehead.
Window Light Makes the Shadow Part of the Portrait
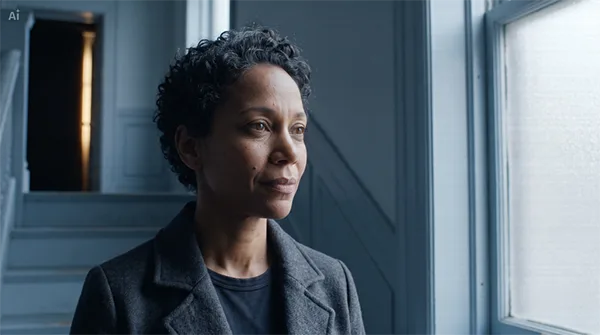
The window version changes the lighting arrangement rather than simply adding a cooler filter. A bright opening beside the subject gives the light a visible source. The face turns toward it, and the darker side of the portrait helps define the cheek and jaw. The setting remains quiet enough for those changes to matter.
When a more introspective portrait suits the scene, choose this approach. If the eyes and expression need to remain clear, ask for readable shadow detail. conversational feel, the broader illumination in the corridor version is a better starting point for a more open look. Neither choice requires making the skin smoother or the colors more saturated.
A Cinematic Portrait Prompt You Can Adapt
CapCut’s AI image generator supports creating images from text descriptions and refining them with further prompts. All three portraits here were generated in CapCut. The following prompt brings the main decisions together without relying on a long list of camera brands or quality labels.
Portrait prompt
Create a horizontal photorealistic film still of one fictional woman in her early forties, with medium-brown skin, short naturally curly black hair, a few gray strands at the temples, and subtle smile lines. Show her head and shoulders in a charcoal wool coat, standing slightly right of center in a quiet old theater corridor. She looks just off-camera left with a thoughtful, understated expression. Broad, soft neutral light from camera-left illuminates her face. A dim amber lamp appears farther down the corridor, with a muted burgundy curtain at the edge of the frame. Keep the background darker than the face. Use restrained contrast and subtle film grain. Preserve gentle tonal variation, individual flyaway hairs, and fine skin texture where the light reveals it. No glamour retouching, exaggerated sharpening, extra people, text, or decorative props.
Open the tool, enter the description, and generate the portrait. If you have a specific person in mind, for an invented character, a written description keeps the starting point simple. CapCut also supports reference-image input; use a photograph you have permission to upload.
Questions that lead to more useful revisions than asking an AI photo generator to make the image “more cinematic.”Can you identify the main source? Does its direction agree with the nose and cheek shadows? Is the background helping you understand the place, or demanding more attention than the person? Read the first result as a lighting arrangement.
Small Lighting Changes Keep the Face Clear
If the face blends into the background, ask for a slightly brighter main light or a faint light along the hair and shoulder. Keep the surrounding walls dark enough to preserve separation. Brightening everything equally changes the atmosphere without necessarily making the subject clearer.
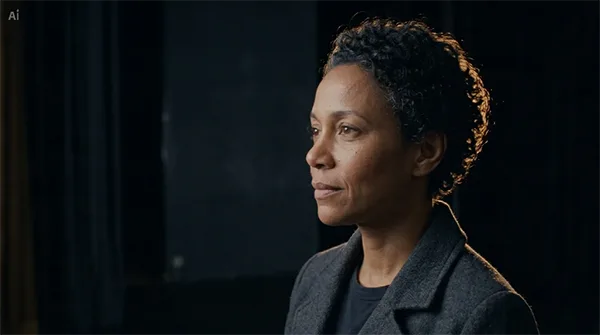
The stage-wing portrait shows the second option. Amber light catches the outer curls and shoulder, separating the dark coat from the stage behind it. Softer neutral illumination keeps the face visible. These lights have different jobs: the rear light defines an edge, while the fill preserves the expression without removing the shadows.
For this arrangement, try a focused instruction: “Place a narrow amber light behind the subject on image-right, tracing the hair and far shoulder. Keep the face darker than the rim but readable with soft neutral fill from camera-left.” Check that the bright edge follows individual hairs and fabric rather than forming a uniform glowing outline. The near-profile angle should still leave the visible eye and cheek legible.
Specify where the color should remain. If colored light overwhelms the complexion, “Keep the amber tone in the distant lamp and hair edge; use neutral illumination on the face.” This is a more precise adjustment than removing all warmth from the picture.
The goal is a believable face at the size people will actually see it. Ask for gentler skin detail and softer highlights while retaining age lines and individual hairs if texture draws attention away from the expression. Avoid replacing one extreme with perfectly smooth skin.
Compare the eyes, nose shadow, and brightest area with the previous result after each revision. Change one aspect of the light at a time so you can judge its effect. When cropping, keep some surrounding space: a doorway or curtain can provide the context that makes a portrait feel like part of a larger scene. Use Download to save it from CapCut when the composition is ready.
Summary
For a quieter portrait or window light for stronger shadows, choose broad illumination. Try a scene of your own with CapCut’s AI image generator, then refine the lighting one decision at a time. Convincing cinematic portraits begin with deliberate light direction, natural variation in skin, and a setting that supports the face.
Frequently Asked Questions
1. How to make the image look realistic?
Ans: Combine strong prompt design with post-generation editing. Use realistic lighting descriptions, camera-style language, and refine details like skin texture and shadows.
2. How do I keep the face the same in different photos?
Ans: Use image-to-image editing instead of generating from scratch each time. Reuse reference images, lock key facial features, and make incremental edits.
3. Why does the image look too smooth or like plastic?
Ans: Use texture cues and negative prompts. Use phrases like “visible pores,” “natural skin texture,” and “subtle imperfections” in your prompt. And use a negative prompt like “no plastic skin, no beauty filters, no over-smoothing.”